
Introduction
Are you looking to improve team collaboration and stay organized? Creating a shared Google Calendar is a fantastic way to achieve just that! Whether you’re managing a project, coordinating family events, or planning social gatherings, a shared calendar can streamline communication and keep everyone on the same page, especially if you outsource scheduling to an assistant.
This step by step guide will walk you through the process of setting up a shared Google Calendar with clear, concise steps and accompanying screenshots for visual assistance. We even included a short video if you prefer to watch it.
Step by Step:
Looking for something else? Browse our extensive library of Calendar Tips to help increase your productivity.
Let Us Show You Just How Simple it is In Video

Step by Step Guide to Creating a Shared Calendar with Google
First, navigate to Google Calendar by visiting calendar.google.com in your web browser. Ensure you’re logged into the Google account you want to use for the shared calendar.

On the left side of the screen, find the “Other calendars” section. Click the “+” (plus) button next to it and select “Create new calendar”.

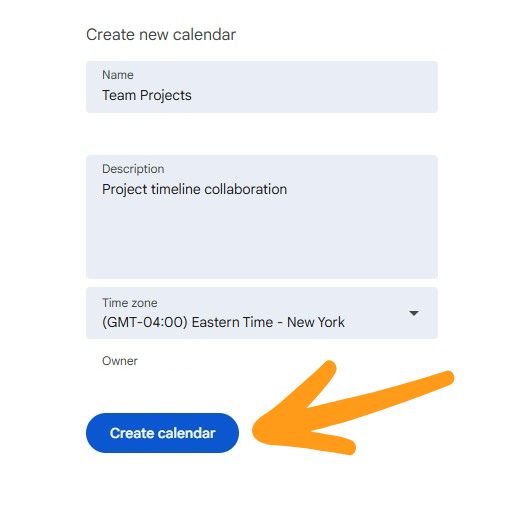
In the “Create new calendar” window, give your calendar a descriptive name (e.g., “Team Projects”, “Family Events”, “Meeting Schedule”). You can also add a description if desired. Then, click the “Create calendar” button.
Once the calendar is created, go to the “My calendars” section. Hover over the calendar you just created, click the three dots (menu), and select “Settings and sharing”.

In the calendar settings, scroll down to the “Shared with” section. Click “Add people or groups”. Enter the email addresses of the individuals you want to share the calendar with and set their permission levels (e.g., “See all event details”, “Make changes to events”, “Make changes and manage sharing”). Click “Send”. This is also helpful if you have someone setting up meetings for you directly in Gmail.
Note: If you already created a group in Google calendar, the group name should appear and you can select it once, which will make it available to the entire group you created.

It’s crucial to choose the right permission level for each person.

The individuals you shared the calendar with will receive an email notification. They can add the calendar to their Google Calendar by clicking the link in the email.
Related Calendar Sharing Guides


Common Shared Calendar Issues and How to Fix Them
Even though Google Calendar sharing is usually pretty straightforward, users have occasionally run into issues and asked for help from us. Here are the most common problems, and how to solve them quickly:
1. Invitees Didn’t Receive the Email
Fix: Ask them to check their spam or promotions folder. Alternatively, have them go to calendar.google.com and look under “Other calendars” to manually add the shared calendar using the invite email address.
2. Shared Calendar Isn’t Showing Up
Fix: Make sure the calendar was added correctly by the recipient. Sometimes, recipients must refresh their Google Calendar or check their calendar list settings to make sure the new calendar is visible (checkbox enabled).
3. Permissions Are Too Restrictive
Fix: Go back to “Settings and sharing” for the calendar and double-check the permission level you’ve assigned. If someone needs to edit events but only has view access, adjust their setting to “Make changes to events.”
4. Trying to Share with Non-Google Accounts
Fix: Google Calendar works best when sharing with Gmail or Google Workspace users. If the person you’re trying to share with doesn’t use Google, consider using CalendarBridge to sync calendars across platforms like Outlook, Outlook Family Plan, Exchange, and Google. It’s seamless and doesn’t require everyone to be on the same platform.
5. Accidentally Shared Too Much
Fix: You can always revoke or limit access by returning to the “Shared with” section in calendar settings. Click the trash can icon next to the user’s name to remove them, or adjust their permission level. Learn more about Google calendar privacy settings.
Share All Your Calendars, Even Across Platforms
Sharing a Google Calendar is a great start, but what if your team uses a mix of Google and Outlook, or you manage calendars across multiple accounts? That’s where CalendarBridge comes in.
With CalendarBridge, you can:
- Sync a Google Calendar to Outlook and have it automatically reflected in Outlook or Microsoft 365
- Share PTO or vacation calendars, team schedules, or personal events across accounts
- Avoid missed meetings or scheduling conflicts by ensuring every calendar shows the same availability
- Keep your shared calendar updates flowing in real time, without copy-pasting or manual changes
Setting up a shared calendar in Google takes just minutes. With CalendarBridge, you can go a step further and unify your entire scheduling environment, no matter which platforms you use.
Sync All Your Calendars with CalendarBridge

Frequently Asked Questions
Yes, but with limited functionality. You can make the calendar public and send them the link, or share it with their email address. However, to fully interact with the calendar (like adding/editing events), they’ll need a Google account.
Sharing a calendar means giving others access to view or manage a specific calendar, usually within the same platform (like multiple Google Calendars). It’s great for collaboration but doesn’t combine or update information across multiple calendars.
Syncing, on the other hand, means keeping two or more calendars, possibly across different platforms like Google, Outlook, or Exchange, automatically updated with the same events. Tools like CalendarBridge handle syncing, so no matter where an event is added, it appears everywhere in real time. Learn more about the difference between syncing and sharing a calendar.
“View only” lets the person see your calendar but not change anything. “Make changes to events” allows them to edit, add, and delete events. “Make changes and manage sharing” gives them full control, including the ability to share with others.
Yes. Go to Settings and sharing for your calendar, find the person’s name in the “Shared with” section, and click the trash can icon to remove access.
Make sure you entered their correct email address, and remind them to check their “Other calendars” list. They may need to manually refresh Google Calendar or accept the invitation from their email.
Google Calendar doesn’t natively sync with Outlook. For real-time syncing across Google and Microsoft platforms—including shared calendars—CalendarBridge is the best solution. It ensures your updates appear everywhere, instantly.
Final Thoughts
By following these simple steps, you can effectively create and share a Google Calendar, improving organization and collaboration within your team or family. This guide should help you streamline your scheduling and ensure everyone stays in the loop. Shared Google Calendars are an essential tool for efficient communication and time management! To get even more from your Google calendars, consider using CalendarBridge to keep all your calendars in sync!